Showing posts with label Work in Progress. Show all posts

Monday, November 7, 2011

Brilliant Idea!

I was blog browsing this morning and on Kristen's blog So Happy I noticed something I hadn't seen before. The smart woman has a tab that links to a page of her current WIPs! (all of which are awesome, by the by)

That is "Works in Progress" for any of you non-quilty peeps out there.

I made one of my own of course. I like the idea of having an ongoing page to display what I'm working on. I have 2 tops, one basted sandwich, and one project that is still in the block stage --- and I'd like at least two of them finished quilts before the 'Sentimental Reasons" Quilt Show in May. Yup, someone is a little nuts.

At least if I don't finish anything else, my Farmer's Wife Sampler Quilt is ready to go!


Monday, October 3, 2011

William Morris

"All artists love and honor William Morris" --- Frank Lloyd Wright 

Two things happened this summer that led to my obsession with Morris & Co. I saw this line of fabrics from Moda/Barbara Brackman:

"A Morris Tapestry" - Moda Collection

And I drooled over these textures and colours and really really really wanted to buy them. I thought of getting a charm pack but that seemed like getting paint colour chips instead of buying the paint -- if that makes sense! I had my heart set on one of the FQ bundles and I patiently waited for funds to reappear in my paypal account ....


Then one of those naughty "enablers" at QATW dropped this link casually in chat one summer day. Click and go see.

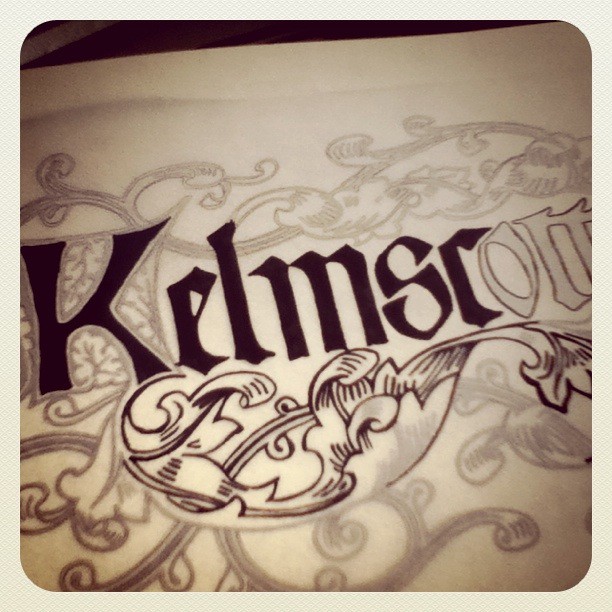
And then it was all over. I ordered the book that has instructions to make the Kelmscott quilt (the one in that picture) and started researching William Morris, and generally jumped in way over my head as usual. I spent hours and hours and hours reading about Morris and his family (his daughter May was also one of his business partners), his company, and in general everything about the Arts & Crafts movement in the late 1800s.


Well before the end of July I had the book, 6 yards of cream background, and multiple stacks of fabrics ready to be used. And then I put the stupid restriction on myself that I wouldn't START this glorious project until I finished the Farmer's Wife Sampler. Oh, the torture. You see I have realized that my teeny tiny sewing space just doesn't support multiple projects --- I like to stack fabrics, keep my workspace just so, have everything I need at hand .... And with FWS burying EVERYTHING I would never make any progress on an applique quilt.

So I finished FWS ...

And then I finished a stack of customer quilts, collected & tested a bunch of blocks for my local guild's BoM, made a bargello from batiks, and finished making blocks for the QATW BoM. See? I earned it like a good little quilter!

I am making the blocks the way I like to applique -- with fusible and my machine zigzag in matching threads. That is also the way it is done in the book, which I understand upset some hand-workers. When I started tracing the key blocks on the pattern pages however it occured to me ---- "These are not reversed shapes!"

If you have never used fusible webbing you might not "get it" but when you fuse your shapes they go on the BACK of the fabric so that the magic stickum is applied to the back as well. That means your fabric shapes are the reverse of what you just traced. Which means you can't use the pattern you just traced as a key block/layout guide. So you have to wing it --- certainly not my favorite, especially considering how intricate the blocks are.

Assemble blocks based on these with no key block? I don't think so
There are a few ways to get the shapes flipped properly so you can use the pattern sheet as a layout as well. First and easiest might be to photocopy the pages and say to the machine "flip horizontally please!". With my little 3-in-one printer though I didn't feel up to scanning blocks that are meant for 12 1/2" squares. Another way I considered was to use a double-papered brand of fusing like Steam A Seam. That way I could trace the shapes and cut them all out and then peel the paper from the side with the marks and fuse them to fabric. BUT. I don't LIKE to cut fusing paper with no fabric to stabilize it. It rips too easily, and you can't prearrange your shapes to minimize waste of fabric and fusing. The way I do that is to trace "groups" of shapes that I know will all be from the same fabric --- like leaves -- and cut them roughly as a large clump and then fuse them and do the fine cutting.

Finally I just traced the shapes onto regular paper, then flipped that paper and traced them onto the back side with permanent marker. I arrange my shapes so they were already clumped in fabric groups. I use those pages to trace onto my fusing, and then I can use the pattern page to lay out the shapes on the fabric. Ta-Da!

Progress!

So far I have 16/16 of the birds in the setting triangles finished, and 15/41 floral blocks finished. I'm still deeply in love with all things Morris. I dare you to go search "William Morris". You won't get away from the computer for awhile!


Friday, June 24, 2011

Jelly Roll Bargello


Bargello, originally uploaded by sailbit.
I love bargellos. Love love love em -- so it was inevitable that I get around to making one. Ta da - mine is made from an island batiks jelly roll in "sweet pea" by Hoffman. This is a nice picture of part of the top - right now it is kinda long and gangly looking until I figure out what I want to do for borders.

When the bargello obsession hit I went and researched how they were made. It makes for interesting reading, loaded with eye candy. On warning I read over and over was "do not attempt in batiks!"

The basis of the bargello is that the fabrics you use are predictable from one segment to the next in order to carry the wave pattern you are creating. With batiks - especially batiks that vary -- the whole thing gets VERY tricky. Since I wanted to go with a soft watercolor palette in blue and purple, things got tougher. Sometimes I really am my own worst enemy.

Oh wait, it is gorgeous isn't it? I guess I'm not an enemy to myself after all :)

Tuesday, May 31, 2011

Cathedral Windows


Cathedral Windows, originally uploaded by sailbit.
Even quilters who are allergic to hand sewing (like I am) will find ways to get into trouble a.k.a. new projects ..


Making up frames! More than 50 individual squares -- only about a dozen blocks 9x9".

The method I like best: HERE

I don't think it is much faster than the tutorial I was working with originally (This one) but there is much less ironing, no need for a cardboard template, and the units are much more 'uniform'. Also less flappy and more stable!

Sunday, April 24, 2011

Spirit of the Northwoods - Progress!

Nine of Twelve blocks - fused, bordered, and stitched

As I mentioned awhile ago I have been working on a big applique project - Spirit of the Northwoods from the book of the same title by Debbie Fields. When I see a quilt I like I usually do some research on the internet and see what other quilters have done with the same pattern. I was not able to find a single example of all 12 blocks set in a quilt -- just a few blocks done as a wall hanging. I'm flying blind!

Almost all of the appliques have been cut from scraps. I trace the shapes I need onto light fusible paper and make clusters of the ones I want to be of the same fabric. That way I have an approximate idea of what size scrap I need to find and also I don't lose some of the teeny tiny pieces.

Then I take a deep breath and do a swan dive into my scrap bin -- which is a canvas tote that my 3 year old daughter can comfortably sit in! Then when I have what I want I use my big sharp scissors to do the cutting. Most of the pieces are tricky and pointy and fiddly to cut but I find that the extra blade length on the scissors allows for smoother cutting, as long as you pay attention to your twists and turns.

More on stitching later!

You know me, I'll probably have bounced to a different project by the time I get back to do another post.

Happy Easter!

Tuesday, April 19, 2011

Hop To It! - Warning: Addictive project


Cut & fused all 12 blocks in less than a week. I'm in love <3

And now the agonizing wait for more thread to arrive for me to stitch them all in place, sash them, and finish the top!

I may have to make another set of blocks in a different colour scheme ... ;)

P.S. I think I need to re-do block #1 -- it wasn't centered at all :(

Thursday, April 7, 2011

Hop To It!


Fleur Delight - Hop To It #2, originally uploaded by sailbit.
I've hop hop hopped into another project with the help of my QATW buddies - This time an applique project from the talented Edyta Sitar of Laundry Basket quilts. She is a fabric designer for Moda and has made several gorgeous batik lines. Check out her book, "Hop To It!" or check out our thread on www.QuiltingAroundTheWorld.com for more on this project.

 I'm following in Edyta's footsteps and using as many batiks as I can. NEVER underestimate the value of having a big stack of green fabrics when you are doing applique!
Rose of Sharon Wreath - Block #3


  Edyta's preferred method of applique is to use fusible webbing, and finish the edges with invisible thread in a teeny tiny zigzag. I decided to try it as well and boy am I happy with it! It is super speedy once you get the thread settings right.

Friday, January 28, 2011

What I'm working on (while I avoid basting)


"Spirit of the Northwoods" By Debbie Field

Each block represents a different month, with either and animal or an activity depicted. Raw edge machine applique -- mmm, just how I like it! 

I know this project deserves to have a lot more said about it but right now I am just muddled with winter headache/toothache/alloverache -- so I'll leave this here to remind me to put in a proper paragraph 'at some point'.

Now even my blog has UFOs :(

Wednesday, January 19, 2011

Farmer's Wife Sampler Quilt - Top Done!

Original quilt by the author in period appropriate fabrics:


My version of the quilt, done in scraps and with colour changes (and layout) here and there:

Tuesday, January 11, 2011

Cherish Nature - Jelly Roll Quilt

Cherish Nature Quilt Top
64"x80" - Jelly Roll Friendly!

So Rachel Griffith (psiquilt.com) made a gorgeous quilt which was featured in Quiltmaker last summer. I drooled. I wanted one of my very own! And I thought: I really REALLY want to buy a jelly roll of Deb Strain's "Cherish Nature" fabric collection by Moda - 2.5" strips. The original pattern used a different size, and different blocks as well. Something had to be done! I got my quilter's math cap on and set to with paper and pencil and figured out the measurements to use up a whole jelly roll.

Ta-Da!


Download my instructions here if you must have a jelly roll top finished lickity-split :)

Saturday, January 8, 2011

Finished! Well ... The blocks, anyway

A lot of blocks. A lot of improvement in my piecing skills. I went 1 day over my goal of finishing all my blocks in 2010. Can't wait for the sashing fabric to arrive in the mail!!!

Friday, December 17, 2010


1. #01 - Attic Window, 2. #02 - Autumn Tints, 3. #03 - Basket, 4. #04 - Basket Weave, 5. #05 - Bat Wing, 6. #06 - Big Dipper, 7. #07 - Birds In The Air, 8. #08 - Bouquet, 9. #09 - Box, 10. #10 - Bowtie, 11. #11 - Broken Dishes, 12. #12 - Broken Sugar Bowl, 13. #13 - Buckwheat, 14. #14 - Butterfly at the Crossroads, 15. #15 - Buzzard's Roost., 16. #16 - Calico Puzzle, 17. #17 - Cats & Mice, 18. #18 - Century of Progress, 19. #19 - Checkerboard, 20. #20 - Churn Dash, 21. #21 - Contrary Wife, 22. #22 - Corn & Beans, 23. #23 - Country Farm, 24. #24 - Country Path, 25. #25 - Cups & Saucers, 26. #26 - Cut glass dish., 27. #27 - Darting Birds, 28. #28 - Duck & Ducklings, 29. #29 - Economy, 30. #30 - End of Day, 31. #31 - Evening Star, 32. #32 - Farmer's Daughter, 33. #33 - Farmer's Puzzle, 34. #34 - Flock, 35. #35 - Flower Basket, 36. #36 - Flower Garden Path 37. #37 - Flower Pot, 38. #38 - Four Winds, 39. #39 - Friendship, 40. #40 - Friendship Block, 41. #41 - Friendship Star, 42. #42 - Fruit Basket, 43. #43- Garden Path, 44. #44 - Gentleman's Fancy, 45. #45 - Grape Basket, 46. #46 - Hill & Valley, 47. #47 - Homemaker, 48. #48 - Homeward Bound, 49. #49 - Honeycomb, 50. #50 - Honey's Choice, 51. #51 - Hovering Birds, 52. #52 - Hovering Hawks, 53. #53 - Jackknife, 54. #54 - Kitchen Woodbox, 55. #55 - Linoleum, 56. #56 - Maple Leaf, 57. #57 - Morning, 58. #58 - Mother's Dream, 59. #59 - Night & Day, 60. #60 - Noon & Light, 61. #61 - Northern Lights, 62. #62 - Old Windmill, 63. #63 - Ozark Maple Leaf, 64. #64- Peace & Plenty, 65. #65 Peaceful Hours, 66. #66 - Periwinkle, 67. #67 - Pine Tree, 68. #68 - Postage Stamp, 69. #69 - Practical Orchard, 70. #70 - Prairie Queen, 71. #71 - Puss in the Corner, 72. #72 - Railroad
 

Monday, November 1, 2010

Friday, October 22, 2010

Another handful done!

1. #30 - End of Day, 2. #29 - Economy, 3. #28 - Duck & Ducklings, 4. #08 - Bouquet, 5. #27 - Darting Birds, 6. #25 - Cups & Saucers, 7. #24 - Country Path, 8. #22 - Corn & Beans, 9. #23 - Country Farm


Still having a lot of fun making these blocks! I'm getting much better at the technical aspect of piecing (I think?) and I'm also beginning to really enjoy picking fabrics and colours for each block -- Digging through my stash of scraps, yardage, charm packs, and other pre-cuts has become like a miniature treasure hunt each time I turn a page!

Wednesday, September 29, 2010

Farmer's Wife Quilt - A few blocks finished!


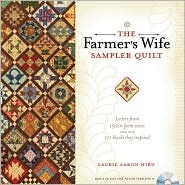
Working my way through the blocks in Laurie Aaron Hird's book "The Farmer's Wife Sampler Quilt" seems to be as close to taking a quilting class as I can get and still wear pajamas! So for the last few days that is exactly what I have been doing.

Let's try this one ..
The book comes with a disk that includes PDF files for each of the 107 templates used in the blocks -- a separate PDF for each?! Now I'm no publisher but you would think that someone in the disk-making-department would use a bit more common sense. Because no quilter in her right mind is going to want to print 107 pages, especially when some of the templates are 2 1/2 inch blocks or 3 inch triangles. I think they really let the author down on that aspect. I'd scream bloody murder if I put all that time and energy into writing a book and the disk included looked like a 7th grader's geometry project.
 
{Of course, the publishers & EQ seem to be angling for some extra cash since there is an EQ companion CD you can buy separately. No wonder they put no effort into the free disk!}

Luckily the ones who have gone before me in making this quilt were of like minds, and they rearranged all the templates into a single PDF file of 14 pages. I thought "Woohoo, this I can live with!" and downloaded that baby right away.Then I set to work with my ruler and worked out measurements for quite a few of the simple shapes - even down to 16ths in some cases. Cause there is nooooooo way I am cutting & piecing twenty or more one-inch HSTs the hard way just for one block:
Tiny HSTs .. no problem! Chain em up

The project is definitely helping with my piecing skills (as intended!) I'm primarily working from scraps/stash fabric, so right now the blocks I have made don't look like they will play nice together in a quilt ... But I'll figure something out at the end!


Day 1 Blocks - Err, nice effort but I will remake some of these!
Day 2 Blocks - Now we are getting somewhere!

*Marking the name and number of each of the blocks on a square of masking tape might be a little over-organized, but ... I like it that way :)

Friday, September 10, 2010

New Books Are Yummy!


Currently being shipped via Barnes&Noble :)

Synopsis


Be Inspired by the Stories
In 1922, The Farmer's Wife magazine posed this question to their readers: "If you had a daughter of marriageable age, would you, in light of your own experience, have her marry a farmer?" The magazine at that time had 750,000 subscribers, and received over 7,000 letters. The best answers to this question are included in this book, along with the traditional quilt blocks they inspired.

Laurie Aaron Hird provides everything you need to be inspired and create your own sampler quilt:
  • 111 six-inch quilt blocks, with construction diagrams for piecing the blocks and template cutting directions
  • Complete instruction for making a sampler quilt in any traditional size: lap, twin, queen or king
  • CD with easy-to-print, full-sized templates for all 111 blocks, and printable quilt construction diagrams
  • 42 letters from the 1922 Farmer's Wife contest to give you a priceless glimpse into our country's past

Wednesday, September 1, 2010

Stacky Whacky ..

My camera broke
My glasses broke
My sailboat broke
My OTHER sailboat (family boat) broke
And summer vacation was fun but totally exhausting

On the bright side I was gifted a whole shelf of great quilting magazines and books. You might have heard of this one by Bethany Reynolds ... "Magic Stack n Whack"?


What a great way to cheer up :)
Being able to use a design wall for the very first time helps too ..

Whacked yardage is all by Kona Bay, Nobu Fujiyama collection:

Wednesday, June 2, 2010

Adventures with Quilt-as-you-go.

I have been diligently sewing away at home, in between enjoying some gorgeous weather and of course all the blog posts from the Spring Quilt Market. I would love to go there one year --- I bet it is great fun when quilters take over a city!

My Amish Spring Roses quilt is zipping right along. Here is a picture of one of the side panels --- and about 15 inches of progress on the cable/feather twist motif. Oh boy, only 81 inches left --- on THIS one :D And then of course the other side and also the bottom will need matching feather twisties. Good thing I am having fun doing them!

I do also have the entire center panel done, and the pillow panel with its applique. I definitely need to use larger backing blocks next time I do gigantic applique blocks, because I underestimated the amount they would gather in and it was tricky to stitch the blocks together. I'm a little disappointed with the looseness of the backing between blocks, but maybe if I don't mention it people will think I planned it that way ... as part of the charm of a comfy country quilt ..

And maybe I will have to hand stitch a tuck along the top seams so that the blocks lay flatter and please my sense of quilt propriety.


Friday, April 23, 2010

Colour at last - Dresden Style

I have recently been whining about being driven to complete a Fall-themed quilt --- the Deer in their rust and gold and brown tones. It is harder than you think to finish when there are colourful flowers blooming all around, and glorious bright fabric waiting to be used! My treat for slogging through the whole quilt without breaking down and starting another project?


COLOUR!

Awhile ago I browsed and browsed pictures of Dresden plates & fans, and I was disappointed to see so few done in simple jewel tones and brights. I saw a lot of them in eye searing, fussy, busy "grandma" prints ... like someone had pieced them from a collection of cloth they inherited from crazy great aunt Ester and they didn't care what happened to them because they still smelled like mothballs and old TV guides. How sad for the poor Dresden plate ...

Don't get me wrong, I did see some truly lovely quilts from this traditional block. But I thought it would increase my quilting karma a few notches if I addressed the poor injustice of the block rarely being done in brights that DON'T trigger an epileptic seizure. 

I alternated my colours with creamy white to balance it all out and make it a little different. I never saw that style in all the ones I browsed, so it satisfied my desire to do things a little differently (off center?)
Here are some samples of what I whipped up


Each one is a little different, bright and scrappy and gorgeous! It will be a queen sized quilt when finished --- but I need more cream fabric to finish the last 6 plates I need. And something pretty for the back of the block, since I am still on the fence about what to use. I am thinking a white tone on tone floral, or a faded green pastel ... And I'm still musing on how to finish the centers. And the border ...

But at least I got to shift into spring colours!