

Monday, December 19, 2011
Friday, December 16, 2011
Wednesday, December 14, 2011
Don't Worry, It Isn't Contagious
It finally happened -- after 2 years of non-stop quilting, I lost my mojo. For the past few weeks I haven't looked at any fabrics, or window/internet shopped, or turned on my machine, or ANYTHING.
Quilting doldrums.
Why? I am not sure - I know part of it was frustration over being unable to connect to my QATW chat. I would log in to talk to my girls and find out what was happening in the world and *KICK* I would be tossed out of the chat room for no reason. Talking 30 seconds at a time turned out to be beyond my skills. And quilting really is all about sharing to me.
I also know it had to do with the "Basting Blues". That is the point when all of the projects you want to progress with need to be basted. Lucky lucky me, I had 4 or more quilts all needing ironing (ick) and basting (double ick). I have to do all of my ironing in a 2x2 space because I have no ironing board, and I really am short on space to baste things properly in our tiny townhouse.
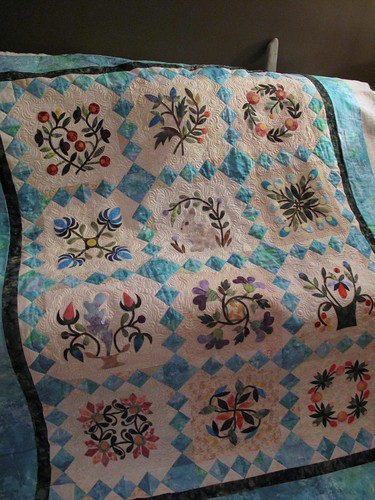
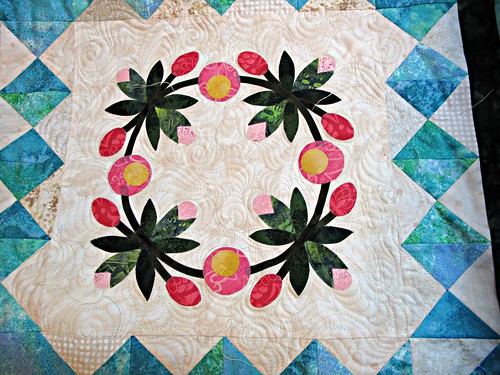
The other thing keeping me down was - yeah you guessed it - feeling inadequate as a quilter. Yes, I do pretty well on a domestic and I've made some nice quilts --- but they are never as polished or look like I wished they did in my head.
And then I realized that is a dumb way to think about quilting. Somehow, in looking at picture after picture of show quilts from Houston and Paducah and all over the world I tricked myself into thinking every quilt had to be 'show quality.'
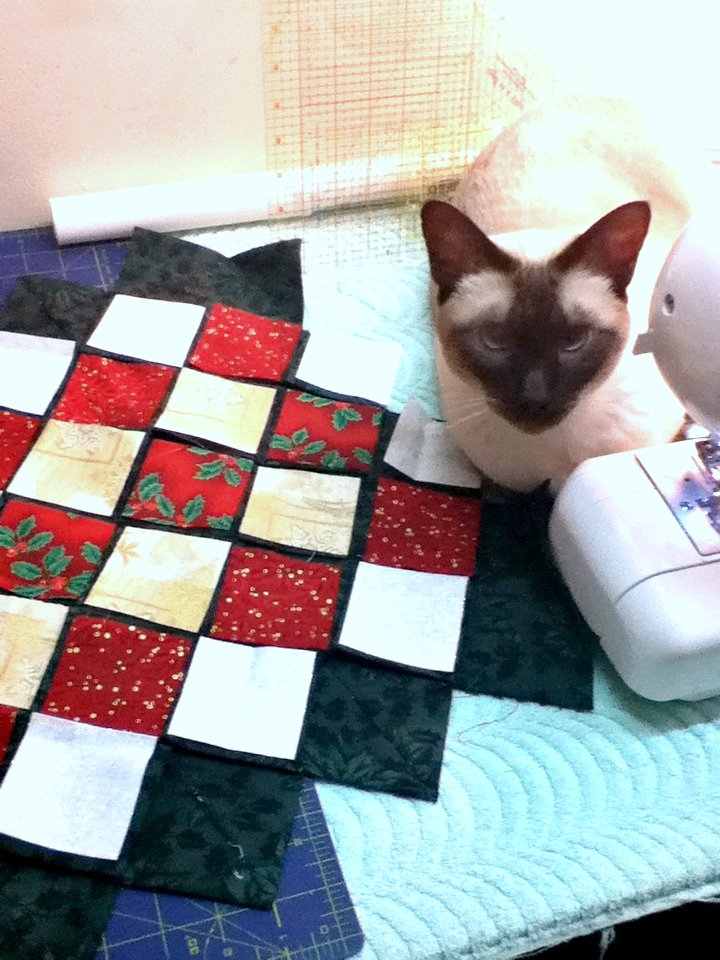
My quilts aren't "polished" because I'm not running a stitch regulated long arm with a price tag equal to a year's rent, and I don't have pantographs to follow. They are made with points that don't match because I like to have FUN making a quilt, not obsessing over pinning every little piece. They are covered in cat hair cause I love my cat, and let him sit behind my machine. I like to have a glass of wine (or three) while I piece and baste and quilt, and that has produced some funny stories. None of my motifs match the others exactly because I hate marking.
The bottom line is - I quilt because it makes me happy, and I'm happiest doing it my way. It is a different matter with customer quilts, but as far as my own quilt making goes: There will be cat hair, mismatched points, a few tension wobbles, and whatever else I feel like!
And on that note, guess what I basted last night?

Quilting doldrums.
Why? I am not sure - I know part of it was frustration over being unable to connect to my QATW chat. I would log in to talk to my girls and find out what was happening in the world and *KICK* I would be tossed out of the chat room for no reason. Talking 30 seconds at a time turned out to be beyond my skills. And quilting really is all about sharing to me.
I also know it had to do with the "Basting Blues". That is the point when all of the projects you want to progress with need to be basted. Lucky lucky me, I had 4 or more quilts all needing ironing (ick) and basting (double ick). I have to do all of my ironing in a 2x2 space because I have no ironing board, and I really am short on space to baste things properly in our tiny townhouse.
The other thing keeping me down was - yeah you guessed it - feeling inadequate as a quilter. Yes, I do pretty well on a domestic and I've made some nice quilts --- but they are never as polished or look like I wished they did in my head.
And then I realized that is a dumb way to think about quilting. Somehow, in looking at picture after picture of show quilts from Houston and Paducah and all over the world I tricked myself into thinking every quilt had to be 'show quality.'
My quilts aren't "polished" because I'm not running a stitch regulated long arm with a price tag equal to a year's rent, and I don't have pantographs to follow. They are made with points that don't match because I like to have FUN making a quilt, not obsessing over pinning every little piece. They are covered in cat hair cause I love my cat, and let him sit behind my machine. I like to have a glass of wine (or three) while I piece and baste and quilt, and that has produced some funny stories. None of my motifs match the others exactly because I hate marking.
The bottom line is - I quilt because it makes me happy, and I'm happiest doing it my way. It is a different matter with customer quilts, but as far as my own quilt making goes: There will be cat hair, mismatched points, a few tension wobbles, and whatever else I feel like!
And on that note, guess what I basted last night?

Hop To It
Tuesday, November 15, 2011
Here is a quick introduction to some new 'technology' stuff that has been rampant in the blogging world for a few months now.
{Disclaimer - I'm not associated with Pinterest, I just think it is a truly awesome site and I spend waaaaay too much time looking at pretty pictures, and pinning quilting pictures.}
Best of all, you can browse pinboards created by other people. Browsing pinboards is a fun way to discover new things and get inspiration from people who share your interests.
Maybe it is my lack of coffee, maybe I just want you to experience the same awe and joy that I did when I first joined the site ---- But I really can't explain it much better than the blurb above that came from the official site. In terms of the computer skill level you need it is only medium-tricky. You request an invite (from me, or from them - it is just a way of confirming that you are a real person and not a spammer program), log in, and get the "Pin It" button. It is exactly like a bookmark button, but when you click it you won't be taken to another site. Instead you will be shown all the pictures that can be seen on the page you were looking at -- you select one and type a quick description in the window that pops up - and ta-da, you have pinned something.
Why are pins so cool?
They are bookmarks with PICTURES. Have you ever been frustrated while looking through your list of bookmarks because 1) you can't find the one you are looking for and 2) you don't remember what half of the darned things are for anymore? Your Pinterest boards replace your bookmarks completely. Now when you want to find a quilt or a recipe that you saw last week, you just open your board and scroll through your pictures. Once you find it - click on the picture and it takes you right back to the original website that the picture came from.
Like magic.
I have added another page that will take you directly to my Pinterest board, "Quilting Obsessed." It is my ongoing collection of inspirations and links and cool stuff to look at. Enjoy!
{Disclaimer - I'm not associated with Pinterest, I just think it is a truly awesome site and I spend waaaaay too much time looking at pretty pictures, and pinning quilting pictures.}
 |
| www.pinterest.com |
What is Pinterest?
Pinterest is a Virtual Pinboard.
Pinterest lets you organize and share all the beautiful things you find on the web. People use pinboards to plan their weddings, decorate their homes, and organize their favorite recipes.Best of all, you can browse pinboards created by other people. Browsing pinboards is a fun way to discover new things and get inspiration from people who share your interests.
Maybe it is my lack of coffee, maybe I just want you to experience the same awe and joy that I did when I first joined the site ---- But I really can't explain it much better than the blurb above that came from the official site. In terms of the computer skill level you need it is only medium-tricky. You request an invite (from me, or from them - it is just a way of confirming that you are a real person and not a spammer program), log in, and get the "Pin It" button. It is exactly like a bookmark button, but when you click it you won't be taken to another site. Instead you will be shown all the pictures that can be seen on the page you were looking at -- you select one and type a quick description in the window that pops up - and ta-da, you have pinned something.
Why are pins so cool?
They are bookmarks with PICTURES. Have you ever been frustrated while looking through your list of bookmarks because 1) you can't find the one you are looking for and 2) you don't remember what half of the darned things are for anymore? Your Pinterest boards replace your bookmarks completely. Now when you want to find a quilt or a recipe that you saw last week, you just open your board and scroll through your pictures. Once you find it - click on the picture and it takes you right back to the original website that the picture came from.
Like magic.
I have added another page that will take you directly to my Pinterest board, "Quilting Obsessed." It is my ongoing collection of inspirations and links and cool stuff to look at. Enjoy!
Sunday, November 13, 2011
Calling Local Bloggers
It occurred to someone {not me} that we could all benefit from a list of local bloggers in the Oakville/Halton/GTA area.
So lets do that!
Simply type in your name and blog address and you will be added to the magical list!
Friday, November 11, 2011
TGIF Inspirations
Here are a few things I have been looking at lately. Fridays are great days to share inspirations, and some of them are especially appropriate for today.
And a free BoM from the lovely and talented Dorothy Baker, made with some of Lecien's new fabrics. I'm wavering between diving in headfirst and making this my second hand-applique project ever (HA) and modifying the pattern to accommodate my preferred applique method .... fusing & machine stitching. That's not cheating, right?

Last but not least here are two websites every Canadian quilter should visit.
Quilts of Valor - Canada
The Canadian Comfort and Remembrance Project
 | ||||
| Free pattern for ANZAC / Remembrance / Veteran's Day. |
 |
| First Place - Art Painted Surfaces, Houston IQF 2011 Loved and Was Loved by INGE MARDAL and STEEN HOUGS of CHANTILLY, FRANCE |
 |
| Dorothy Baker BoM 2011 |
And a free BoM from the lovely and talented Dorothy Baker, made with some of Lecien's new fabrics. I'm wavering between diving in headfirst and making this my second hand-applique project ever (HA) and modifying the pattern to accommodate my preferred applique method .... fusing & machine stitching. That's not cheating, right?
Here is the first block: Download Block One
Last but not least here are two websites every Canadian quilter should visit.
Quilts of Valor - Canada
The Canadian Comfort and Remembrance Project
Monday, November 7, 2011
Brilliant Idea!
I was blog browsing this morning and on Kristen's blog So Happy I noticed something I hadn't seen before. The smart woman has a tab that links to a page of her current WIPs! (all of which are awesome, by the by)
That is "Works in Progress" for any of you non-quilty peeps out there.
I made one of my own of course. I like the idea of having an ongoing page to display what I'm working on. I have 2 tops, one basted sandwich, and one project that is still in the block stage --- and I'd like at least two of them finished quilts before the 'Sentimental Reasons" Quilt Show in May. Yup, someone is a little nuts.
At least if I don't finish anything else, my Farmer's Wife Sampler Quilt is ready to go!

Wednesday, November 2, 2011
Third Weekend in October - Done!
 |
| Third Weekend in October - pieced by C. Sharp |
Ohhhh, this finish feels GOOD. This quilt was shipped to me from Kentucky and I got it in October - I quilted and quilted and quilted and quilted .... And my machine broke.
There were a lot of tears. And I played musical machines until I finally got a little Babylock that could help finish up this beautiful and HUGE quilt. The picture is taken with the quilt on my queen sized bed and there is a huge drop on either side. The measurements are 86x104 according to the pattern but it just felt endless when I was quilting it.
I feel like I'm repeating myself -- but the colours and fabrics in this quilt are absolutely amazing. You really notice it when you have your nose to the needle for hours! Now that I have added all that thread it has a lovely texture too.
I used Superior Bottom Line, Aurifil 50wt, and some Gutermann. I was counting the numbers of bobbins I went through but I lost count and lost the paper I was making the note on. I'm sure in yellow and red alone I used 7 bobbins each of Bottom Line - which is thin 60wt thread so a bobbin holds much more than normal weight cotton.
Soon it will be in the mail back to Carol. I guess I'll just have to make my own ...
 |
| "Please don't send it back ... Mine?" |
Sunday, October 30, 2011


Wednesday, October 26, 2011
Anything you can do ..
My friends in blog land changed their blog templates and backgrounds yesterday. Naturally I was a little jealous super excited -- Patti at Quilted Threads used a gorgeous painting her sister made and Bev at Quilton used a very bright and cheerful and happy swirly option from blogger's collection.
*Pout*
So while I drank my coffee this morning I skipped through some blogger options. Then I googled how to make a blog header from a personal photo. Then I played with some fonts and - Ta-Da! Now I don't feel so left out :)
*Pout*
So while I drank my coffee this morning I skipped through some blogger options. Then I googled how to make a blog header from a personal photo. Then I played with some fonts and - Ta-Da! Now I don't feel so left out :)
Monday, October 24, 2011
Apples, Oranges, and Sewing Machines.

My beloved Babylock Decorator's Choice has been in the hands of the dealership since the 11th of October - So two weeks tomorrow. When I talked to the owner on Tuesday she cheerfully told me that "Oh it hasn't even been looked at yet! It will be a few more weeks, we will call you when it is done!"
NOT GOOD ENOUGH.
She stayed on the phone with me for a few more minutes and I explained that I had customer quilts that needed to be finished (not the least of which is Carol's gorgeous TWIO) and I was losing business. She backtracked a little and explained that their mechanic was tied up at the Creativ Festival for the weekend, but she said "either this coming Saturday or the next. I'll give you a call as soon as I know." Grrrr ... alright. I still didn't believe her.
 |
| My MIL's Kenmore and Patti's Husqvarna 400 |
I have had a borrowed machine - a Husqvarna 400 to be exact from my friend Patti - for a week or so and I tried very hard to build a "working relationship" so that I could at least finish some simple things. At first I couldn't thread it properly. Then I couldn't thread the bobbin properly - then I was cranky because I didn't have 20 spare bobbins to use like I normally do. THEN I couldn't get a 1/4" seam to save my life, even with tape marking the proper place to align fabrics. I fumbled (every time) I went to lift the presser foot --- duh, the lever is on the back left and not on the right side of the throat at all. And I couldn't get this beloved trusty machine to go fast enough for FMQ. I sat in a stalemate for a few days until my Mother in Law brought over her machine .."a right piece of junk" she told me. It turned out to be a fairly unused Kenmore (that's the Sears brand, ladies) that actually worked fine and even ran fast enough for FMQ. But the darned thing kept coming un-threaded and it definitely had none of the modern conveniences I've gotten used to -- drop in bobbins for example, and horizontal spool pins. Or more than 5 stitches. It also sounded like a runaway train.
I was definitely beginning to dislike sewing and getting to the end of my rope when Bev mentioned a mutual friend had a portable Babylock that she was looking to sell. Oh happy day! It was love at first sight. I sewed one seam and {paid that nice lady!} brought it home and played for hours.

It is a Babylock Xscape - a lightweight (12lbs) machine that really isn't much different from my very first Brother sewing machine. That was what I was sewing with this time last year, making my Farmer's Wife Quilt. The presser foot lift is in the right place, the bobbins are the same and drop in, there is a needle up/down button, it goes fast enough for FMQ, and it has a horizontal spool pin. It SOUNDS right, it FEELS right, it works for me!
I have learned a valuable lesson: Do NOT underestimate the attachment you form with a brand of sewing machine you have put thousands of hours into. Oh, you can change brands. But you might pull your hair out for a very long time before you are comfortable. I could have worked with a Husqvarna -- eventually -- but given the opportunity to get back into my comfort zone and get back to quilting?
I'll be bringing your machine back to you tonight Patti. Thanks for the loan!
Friday, October 21, 2011
Quilters Night Out
 |
| Look at them all! |
 |
| "Do you recognize this?" |
Another quilt made by Jackie Tidy was brought out and acclaimed to many shouts and gasps and whistles - I didn't get a picture of that one but I know my friend Patti did and I hope she will share. It was hand appliqued and hand quilted and absolutely stunning. I can't wait to see it hanging in the quilt show this May.
I also got to chat with Dorothy Baker, maker of the fabulous little applique quilt I McTavished. It was neat that we both confessed to it being a practice quilt - machine applique in her case, and McT in mine!
Susan brought me some scraps -- and man oh man, her idea of a 'scrap' is my idea of 'yardage'. I'm tickled to have them --- especially when I saw some of these cute little guys:

The fabric is from a collection called "Tree Huggers" by Studio E. It is all-around CUTE {In my head, that word has a definite Australian sound - not sure why!} but check out that little beaver - D'awwwwwwwwwwww!! I'm definitely considering ordering some yardage of my very own - and I can't wait to see what Susan made with the rest of her pieces that weren't "scraps".
All in all, it was a lovely Quilters Night Out!
Tuesday, October 18, 2011
Stubborn
Have you ever had this problem:
You resign yourself to buying a new tool {lets use scissors for an example} and you know you need to spend more than you have on the cheap ones you currently have. I mean ... you use scissors for everything!
And you are working on a humongous applique project where you need to cut eleventy billion pieces.
The $10 pair from Wal-mart just doesn't cut it. Especially not since the man of the house borrowed them to cut who-knows-what and they back slide a little every time you cut forward. NOT a sign of sharp blades.
So you go to the store and pick up every pair of scissors they have to test the grips on them. I like long blades because I like the smoothness of one slow snip, instead of chopping with a bunch of little snips - that rules out most scissors made specifically for applique. With a little practice you can use long blades to make tight corners and fine details anyway ..
These are super comfortable in the hand. After hours of cutting applique my fingers do not feel like they have been through a meat grinder. They are pretty and the blades are SHARP and the right length too. The price was okay for a high quality product. And they DO look cool - look at those cut-outs in the blades! Don't they look awesome --- like flames painted on a racing car? Must make them go FASTER!
Let me tell you - those cut-outs are horrible. When I cut out my applique pieces and go around curves they JAM because a tip of a leaf will get caught in the hole further back. And then your piece is wrecked. Any little twist you make while cutting means another part of your applique is about to get caught in those STUPID holes.
NOTE: These are shears. They are not meant for applique. They work great for quick {straight} cuts. It is my own stupidity that has resulted in this huge problem. And guess what?
I'm STUBBORN. I'm still using the darned things to cut my applique -- slowly, with much adjusting -- because I was so sure they were going to be perfect. I paid good money for them, so I haven't tossed them in the garbage where they belong. I'm sure the store where I bought them would take them back - but I'm embarrassed to return them. And aside from the dumb holes they really are perfect.
You resign yourself to buying a new tool {lets use scissors for an example} and you know you need to spend more than you have on the cheap ones you currently have. I mean ... you use scissors for everything!
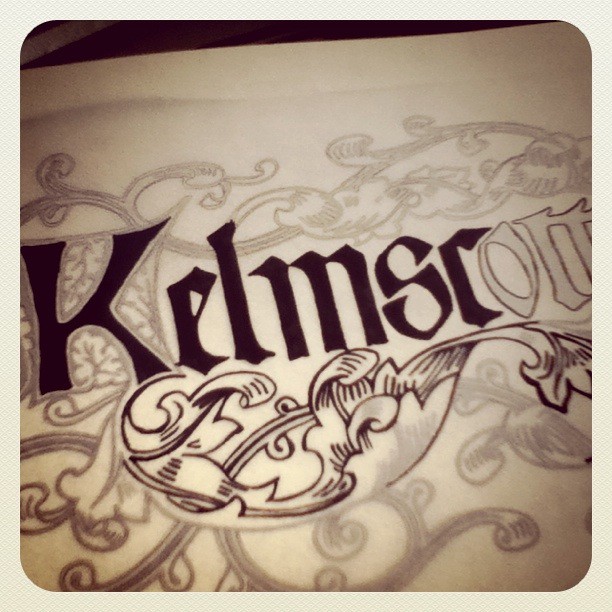
 |
| Kelmscott Manor - Block 8 |
The $10 pair from Wal-mart just doesn't cut it. Especially not since the man of the house borrowed them to cut who-knows-what and they back slide a little every time you cut forward. NOT a sign of sharp blades.
So you go to the store and pick up every pair of scissors they have to test the grips on them. I like long blades because I like the smoothness of one slow snip, instead of chopping with a bunch of little snips - that rules out most scissors made specifically for applique. With a little practice you can use long blades to make tight corners and fine details anyway ..
 |
| Ooooo these look cool! |
Let me tell you - those cut-outs are horrible. When I cut out my applique pieces and go around curves they JAM because a tip of a leaf will get caught in the hole further back. And then your piece is wrecked. Any little twist you make while cutting means another part of your applique is about to get caught in those STUPID holes.
NOTE: These are shears. They are not meant for applique. They work great for quick {straight} cuts. It is my own stupidity that has resulted in this huge problem. And guess what?
I'm STUBBORN. I'm still using the darned things to cut my applique -- slowly, with much adjusting -- because I was so sure they were going to be perfect. I paid good money for them, so I haven't tossed them in the garbage where they belong. I'm sure the store where I bought them would take them back - but I'm embarrassed to return them. And aside from the dumb holes they really are perfect.
Saturday, October 15, 2011
Slice n' Dice 4-Patch

In the spring a few of the executives
Over the summer I researched blocks to fit some simple criteria: I wanted a collection of blocks that looked more complex than they were and that preferably had some sort of cutting trick involved. I also wanted all of the blocks to fit in a sampler quilt at the end OR create quick quilts on their very own. I'm thrilled beyond expectations with the first block I released in September -- and we haven't even had a second meeting this year for members to bring their blocks in!
The Slice n Dice 4-patch makes awesome quilts - and the blocks themselves get addictive quickly. I gave out the instructions on a Thursday night and by the next Monday one member had made a whole top to show us. Do you want to know how happy that made me? More members have commented on how much they love the block as well - and my QATW "pattern testers" approved.
And then this swap opened at QATW as the second in a series of Breast Cancer Awareness swaps - guess which instructions we are using? {I joined too!}

And I saw Happy Zombie post this picture to her Pinterest board. It has been re-pinned at least 30 times.
And then I went to the Guild Outreach meeting and a group of us combined efforts to make about 20 blocks for a charity quilt.
See? It really is taking over the world ...
Thursday, October 13, 2011
Powerless!

After my last post Murphy's Law jumped up and got me. I shared some tips on keeping your machine clean and happy ---- and a day later my sweet Babylock BROKE. I was happily FMQing and I stopped to shift the sandwich and the machine made an odd "CLUNK". I stared at it carefully and prayed really hard. As I slowly started the needle moving again the sounds were "tink tink tink TINK SNAP" --- the sound of the needle hitting the throat plate and snapping off. After more examination I have concluded that something must be loose in the upstairs part - a something that keeps the needle shaft thingy aligned as it comes down. It is off to the dealer (under warranty still, small blessings) and I have been pretty forlorn. I love that machine! We have such great times together ....
Next up: The little 4-patch that is taking over the world!
| Photo courtesy of QATW |
Thursday, October 6, 2011
Clean your machine ...
Or the lint monsters WILL GET YOU.
See? This is BAD. I have been quilting and quilting and quilting on the Third Weekend in October quilt and not paying attention to the amount of thread I'm running through my Baby. (Lots!)
The picture shows what happens when you do at least 30 hours of FMQ without doing a little maintenance. I'm not talking about having your machine serviced -- I'm talking about the stuff the experts recommend you do after every 8 hours of sewing. Do you know that stuff? Here is a quick rundown:
1) Clean your lint out! You don't have to take your machine apart! Most machines these days have an 'escape hatch' for your bobbin case so you don't have to take the tiny screwdriver to those tiny screws in the throat plate. To get to the dirty part I slide the gray plastic 'escape hatch' off -- its the part that fills in the L-shaped area between the metal throat plate and the white base of the sewing machine --- so that I can lift out the bobbin case and quickly swish the fuzzies out with my little lint brush. If you are nervous about moving pieces in your machine you can likely ask the service people to show you how to do this when you take your machine in for your "yearly" maintenance.
2) Change your needle! I'm not joking here girls - the standard sewing needle is good for about 8 hours of use. Needles are one of the cheapest notions out there and you will be helping your machine out a lot if you give it nice sharp needles to work with instead of DULL ones. DO NOT wait until they BREAK to replace them! That is like waiting for your car engine to explode before you get an oil change ... just not healthy for that expensive machinery!
3) You're done, you have a happy machine! Now treat yourself to something nice --- like a cup of tea or a glass of wine or maybe even a fresh new rotary blade :)
 |
| Red Lint Monster |
See? This is BAD. I have been quilting and quilting and quilting on the Third Weekend in October quilt and not paying attention to the amount of thread I'm running through my Baby. (Lots!)
The picture shows what happens when you do at least 30 hours of FMQ without doing a little maintenance. I'm not talking about having your machine serviced -- I'm talking about the stuff the experts recommend you do after every 8 hours of sewing. Do you know that stuff? Here is a quick rundown:
1) Clean your lint out! You don't have to take your machine apart! Most machines these days have an 'escape hatch' for your bobbin case so you don't have to take the tiny screwdriver to those tiny screws in the throat plate. To get to the dirty part I slide the gray plastic 'escape hatch' off -- its the part that fills in the L-shaped area between the metal throat plate and the white base of the sewing machine --- so that I can lift out the bobbin case and quickly swish the fuzzies out with my little lint brush. If you are nervous about moving pieces in your machine you can likely ask the service people to show you how to do this when you take your machine in for your "yearly" maintenance.
2) Change your needle! I'm not joking here girls - the standard sewing needle is good for about 8 hours of use. Needles are one of the cheapest notions out there and you will be helping your machine out a lot if you give it nice sharp needles to work with instead of DULL ones. DO NOT wait until they BREAK to replace them! That is like waiting for your car engine to explode before you get an oil change ... just not healthy for that expensive machinery!
3) You're done, you have a happy machine! Now treat yourself to something nice --- like a cup of tea or a glass of wine or maybe even a fresh new rotary blade :)
Monday, October 3, 2011
William Morris
"All artists love and honor William Morris" --- Frank Lloyd Wright
Two things happened this summer that led to my obsession with Morris & Co. I saw this line of fabrics from Moda/Barbara Brackman:
And I drooled over these textures and colours and really really really wanted to buy them. I thought of getting a charm pack but that seemed like getting paint colour chips instead of buying the paint -- if that makes sense! I had my heart set on one of the FQ bundles and I patiently waited for funds to reappear in my paypal account ....
Then one of those naughty "enablers" at QATW dropped this link casually in chat one summer day. Click and go see.
And then it was all over. I ordered the book that has instructions to make the Kelmscott quilt (the one in that picture) and started researching William Morris, and generally jumped in way over my head as usual. I spent hours and hours and hours reading about Morris and his family (his daughter May was also one of his business partners), his company, and in general everything about the Arts & Crafts movement in the late 1800s.

Well before the end of July I had the book, 6 yards of cream background, and multiple stacks of fabrics ready to be used. And then I put the stupid restriction on myself that I wouldn't START this glorious project until I finished the Farmer's Wife Sampler. Oh, the torture. You see I have realized that my teeny tiny sewing space just doesn't support multiple projects --- I like to stack fabrics, keep my workspace just so, have everything I need at hand .... And with FWS burying EVERYTHING I would never make any progress on an applique quilt.
So I finished FWS ...
And then I finished a stack of customer quilts, collected & tested a bunch of blocks for my local guild's BoM, made a bargello from batiks, and finished making blocks for the QATW BoM. See? I earned it like a good little quilter!
I am making the blocks the way I like to applique -- with fusible and my machine zigzag in matching threads. That is also the way it is done in the book, which I understand upset some hand-workers. When I started tracing the key blocks on the pattern pages however it occured to me ---- "These are not reversed shapes!"
If you have never used fusible webbing you might not "get it" but when you fuse your shapes they go on the BACK of the fabric so that the magic stickum is applied to the back as well. That means your fabric shapes are the reverse of what you just traced. Which means you can't use the pattern you just traced as a key block/layout guide. So you have to wing it --- certainly not my favorite, especially considering how intricate the blocks are.
There are a few ways to get the shapes flipped properly so you can use the pattern sheet as a layout as well. First and easiest might be to photocopy the pages and say to the machine "flip horizontally please!". With my little 3-in-one printer though I didn't feel up to scanning blocks that are meant for 12 1/2" squares. Another way I considered was to use a double-papered brand of fusing like Steam A Seam. That way I could trace the shapes and cut them all out and then peel the paper from the side with the marks and fuse them to fabric. BUT. I don't LIKE to cut fusing paper with no fabric to stabilize it. It rips too easily, and you can't prearrange your shapes to minimize waste of fabric and fusing. The way I do that is to trace "groups" of shapes that I know will all be from the same fabric --- like leaves -- and cut them roughly as a large clump and then fuse them and do the fine cutting.
Finally I just traced the shapes onto regular paper, then flipped that paper and traced them onto the back side with permanent marker. I arrange my shapes so they were already clumped in fabric groups. I use those pages to trace onto my fusing, and then I can use the pattern page to lay out the shapes on the fabric. Ta-Da!
So far I have 16/16 of the birds in the setting triangles finished, and 15/41 floral blocks finished. I'm still deeply in love with all things Morris. I dare you to go search "William Morris". You won't get away from the computer for awhile!
Two things happened this summer that led to my obsession with Morris & Co. I saw this line of fabrics from Moda/Barbara Brackman:
 |
| "A Morris Tapestry" - Moda Collection |
And I drooled over these textures and colours and really really really wanted to buy them. I thought of getting a charm pack but that seemed like getting paint colour chips instead of buying the paint -- if that makes sense! I had my heart set on one of the FQ bundles and I patiently waited for funds to reappear in my paypal account ....
Then one of those naughty "enablers" at QATW dropped this link casually in chat one summer day. Click and go see.
And then it was all over. I ordered the book that has instructions to make the Kelmscott quilt (the one in that picture) and started researching William Morris, and generally jumped in way over my head as usual. I spent hours and hours and hours reading about Morris and his family (his daughter May was also one of his business partners), his company, and in general everything about the Arts & Crafts movement in the late 1800s.
Well before the end of July I had the book, 6 yards of cream background, and multiple stacks of fabrics ready to be used. And then I put the stupid restriction on myself that I wouldn't START this glorious project until I finished the Farmer's Wife Sampler. Oh, the torture. You see I have realized that my teeny tiny sewing space just doesn't support multiple projects --- I like to stack fabrics, keep my workspace just so, have everything I need at hand .... And with FWS burying EVERYTHING I would never make any progress on an applique quilt.
So I finished FWS ...
And then I finished a stack of customer quilts, collected & tested a bunch of blocks for my local guild's BoM, made a bargello from batiks, and finished making blocks for the QATW BoM. See? I earned it like a good little quilter!
I am making the blocks the way I like to applique -- with fusible and my machine zigzag in matching threads. That is also the way it is done in the book, which I understand upset some hand-workers. When I started tracing the key blocks on the pattern pages however it occured to me ---- "These are not reversed shapes!"
If you have never used fusible webbing you might not "get it" but when you fuse your shapes they go on the BACK of the fabric so that the magic stickum is applied to the back as well. That means your fabric shapes are the reverse of what you just traced. Which means you can't use the pattern you just traced as a key block/layout guide. So you have to wing it --- certainly not my favorite, especially considering how intricate the blocks are.
 |
| Assemble blocks based on these with no key block? I don't think so |
Finally I just traced the shapes onto regular paper, then flipped that paper and traced them onto the back side with permanent marker. I arrange my shapes so they were already clumped in fabric groups. I use those pages to trace onto my fusing, and then I can use the pattern page to lay out the shapes on the fabric. Ta-Da!
 |
| Progress! |
So far I have 16/16 of the birds in the setting triangles finished, and 15/41 floral blocks finished. I'm still deeply in love with all things Morris. I dare you to go search "William Morris". You won't get away from the computer for awhile!
Subscribe to:
Posts (Atom)